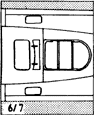
- 1. North American P-51D Mustang. Suggested kit: Hasegawa P-51D, SP51320 (new tool).
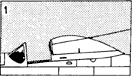
The Clear-Vax canopy
is separated for display in the open position. Note that guide rails need
to be fitted (fabricate these from 0.25 mm plasticard), and that the aerial
wire leads through the top of the canopy and attaches to the rear of the pilot's
armour plate.
Suggested references: P-51 Mustang in Color (Squadron/Signal); P-51 In Action No.45 (Squadron/Signal); P-51 Mustang part 2 (Detail & Scale, Squadron/Signal).
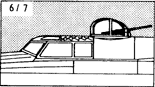
- 2. North American P-51B Mustang. Suggested kit: Hasegawa P-51B&C, SP series.
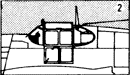
The Clear-Vax canopy
directly replaces the kit item. The drawing shows the canopy open.
Suggested reference: P-51 Mustang part 1 (Detail & Scale, Squadron/Signal).
- 3. North American F-82 Twin Mustang. Suggested kit: Monogram F-82.
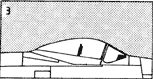
The Clear-Vax canopies
directly replace the kit items.
Suggested reference: F-82 Mini In Action No.1608 (Squadron/Signal).
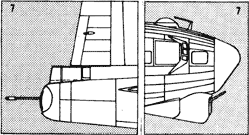
- 4. Martin B-26A/B Marauder. Suggested kit: Monogram Snap-Tite
B-26.
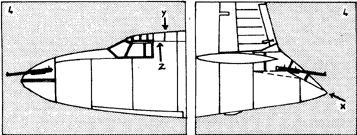
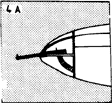
This kit is a hybrid; it represents an early B-26B except for one important
exception - it has the engine cowlings of the B-26A (Marauder I). In order
to build the kit as a B-26A (Marauder I), replace the tail position with the
Clear-Vax canopy. The tail cone will need to be cut away at the line marked
X on the drawing. Cut the base off the kit mid-upper turret, fit the Clear-Vax
part and fix to the fuselage. The main canopy includes the rear of the hinged
top for display in the open position. Cut away the corresponding area at the
lines marked Y and Z. If displaying the canopy closed, cut the rear piece
off and fit directly in place. Fill the hole in front of the windscreen. Drill
a hole in the upper section of the nose cap for a .30 cal MG, as shown in
the drawing. The propellers on this version should have spinners. For the
B-26B, use the kit rear turret, replacing the remaining canopies with the
Clear-Vax items. Note that the nose cap was usually fitted with a .50 cal
MG in the centre, and has two upper internal bracing strips (drawing 4a).
The engine cowlings should be fitted with enlarged upper air intakes; these
can be sourced from the Airfix or Matchbox kits. Also included are wing leading-edge
light lenses.
Suggested references: B-26 In Action No.50 (Squadron/Signal); B-26
Marauder at War, by Freeman (Ian Allan).
- 5. Curtiss C-46 Commando. Suggested kit: Williams Brothers
C-46.
The Clear-Vax windscreen
directly replaces the kit item.
Suggested references: References are scarce for this aircraft. AirEnthusiast
Quarterly No.34 is useful, as is Airpower May 1973.
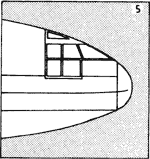
- 6. Boeing B-17E/F Flying Fortress. Suggested kits: Academy
Minicraft B-17E & F.
The Clear-Vax mid-upper turret, radio hatch and nose turrets directly replace
the kit items. To fit the main canopy it is perhaps better to cut away the
kit upper decking as shown shaded in the drawing. For the tail turret, cut
away the upper area from the kit parts and replace with the Clear-Vax item.
Use the kit side windows and ball turret.
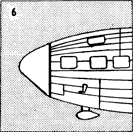
- 7. Boeing B-17G Flying Fortress. Suggested kit: Academy Minicraft B-17G.
The
Clear-Vax nose turret is of the late type fitted to most B-17Gs. This turret
and the astrodome, main canopy, upper turret and radio hatch directly replace
the kit items. Cut the clear area from the tail turret pieces and replace
with the Clear-Vax item. Also included are waist windows as fitted to early
B-17Gs. Use the kit side windows and ball turret.
Suggested references: B-17 In Action No.63 (Squadron/Signal); B-17 Flying Fortress In Detail & Scale, part 1; Bombers of WWII, volume 1 (Aerodata International, Squadron/Signal).