- 1. Grumman F4F Wildcat. Suggested kit: Monogram F4F.
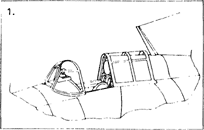
The drawing shows an
F4F canopy fully open. The sill line on the kit will need to be straightened
and the small lugs aft of the cockpit need cutting off. Suggested references:
Aerodata International, US Navy Carrier Fighters of World War II (also includes
F6F Hellcat); Detail & Scale Vol.30, F4F Wildcat.
- 2. Grumman F6F-5 Hellcat. Suggested kit: Otaki/Arii F6F-3.
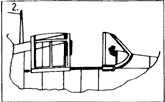
Cut the rear windows
from the kit part, fix them to fuselage halves, then fill them in and paint
them over. Suggested reference: Squadron/Signal In Action No.36.
- 3. Grumman F6F-3 Hellcat. Suggested kit: Otaki/Arii F6F-3.
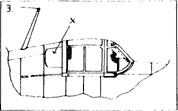
Use the kit rear windows
(marked X on the drawing). Note the longer, forward-slanted aerial mast of
early aircraft. The dotted line indicates the internal armoured glass.
- 4. Douglas SBD Dauntless. Suggested kit: Monogram SBD-3.
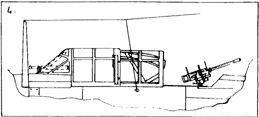
The drawing shows the
gunner's section stowed and the .30 cal machine gun deployed. The dotted lines
show the position of the internal armoured glass windscreen and telescopic
sight. Note that the SBD-4 & 5 versions used a reflector gunsight. The
Clear-Vax canopy parts are designed to overlap each other as on the full-sized
aircraft. Suggested references: Aerodata International, U.S. Navy Carrier
Bombers of World War II (also includes TBF & SB2C); Squadron/Signal In
Action No.64.
- 5. Grumman TBF Avenger. Suggested kit: Monogram TBF.
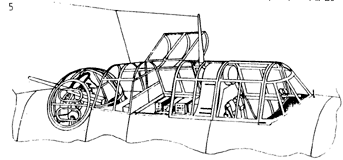

Points
to note on the main drawings are the hinged centre section and rear bulkhead.
The pilot's sliding canopy overlaps the rear part and splits down the centre
when slid back. The scrap drawing shows the underbelly gun position. Cut the
kit piece off as indicated by the arrow and replace with the Clear-Vax item.
To fit the dorsal turret, cut a 2 mm ring off the bottom of the kit turret
and fit it to the Clear-Vax piece. It is not necessary to cut out the slot
for the gun to traverse as this was normally filled by a canvas sheath. Simply
drill a hole for the machine gun in the desired position and fit it after
painting. Suggested reference: Aero Series Vol.21.
- 6. Vought OS2U Kingfisher. Suggested kit: Monogram OS2U.

The sideview shows
the rear canopies in stowed position. Note the alternative ring and bead gun
sight found on most pre-war machines. Suggested reference: Profile
251.
- 7. Curtiss SB2C Helldiver. Suggested kit: Monogram SB2C-4.

The drawing shows an
SB2C-4 cockpit area with sliding canopies open and "turtleback" rear section
down. The dotted line marked X indicates the position of the armourglass windscreen.
In order to fit the windscreen, trim off the inaccurately moulded-on bottom
lugs. The Clear-Vax pilot's sliding canopy has most of the frame lines deleted.
This is to enable the clear section applicable to SB2C-5 to be modelled. The
instrument panel coaming marked Y needs to be trimmed down to the size indicated.
Note the angle of the gunner's sliding section when retracted. If this is
to be modelled open, cut away the shaded area marked Z. If the "turtleback"
is to be modelled in the up position, use the kit clear piece. For the down
position, using the drawing as a guide to cut away this area. Score the Clear-Vax
replacement gently along the horizontal lines and fold it in concertina fashion
as indicated at h, then fit it in place. There are many other modifications
necessary to model this kit accurately, but they fall beyond the scope of
these notes. Suggested reference: Squadron/Signal In Action No.54.


