![]()
![]()
![]()
![]()
![]()

![]()
![]()
![]()
![]()
![]()
![]()
![]()
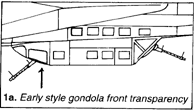
1a. Early style gondola front transparency. This was fitted to some He 111H-1/H-2/H-3/H-4/P-1/P-2/P-4/P-6 aircraft in conjunction with the kit gondola rear transparency. If fitting this piece, cut away the inside area from the kit fuselage.
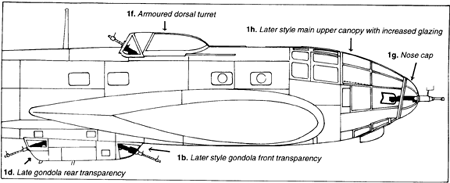
1b. Later style gondola front transparency. This was fitted to some He 111H-3/H-4/H-5/H-6/H-8 aircraft, usually in conjunction with part 1c. It was also fitted to some He 111H-10/H-11/H-16/H-18/H-20/H-21/H-22 aircraft, always in conjunction with part 1d. Fitting is as for part 1a.
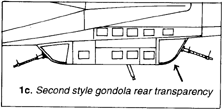
1c. Second style gondola rear transparency. Fitted to some He 111H-3 and H-4 aircraft and all H-6 and H-8 aircraft.
1d. Late gondola rear transparency. Fitted to all He 111H-10/H-11/H-16/H-18/H-20/H-21/H-22 aircraft.
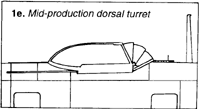
1e. Mid-production dorsal turret. This was retro-fitted to some He 111H-1/H-3/H-4/P-1/P-2/P-4 aircraft. It was standard on He 111H-5/H-6/H-8/H-12/H-15 aircraft.
1f. Armoured dorsal turret. Fitted to all He 111H-10/H-11/H-16/H-18 aircraft.
1g. Nose cap. Fitted to late He 111H-6 and all subsequent He 111H variants.
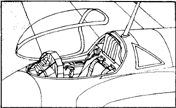
1h. Later style main upper canopy with increased glazing. Fitted to all He 111H-10 and later He 111 variants. Some careful surgery is required to cut away the kit lower nose glazing to fit the Clear-Vax upper and nose cap. On the right side the kit part needs trimming to straighten the join line (kit line shown dotted on diagram). Cut out the upper hatch cavity and fit part 1j (the upper hatch) open or closed.
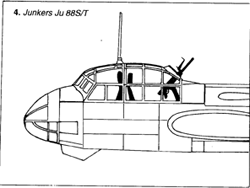
It is suggested that careful study be made of the particular aircraft you wish to model, as there were many variations of turrets and armament throughout the He 111 series. Good luck! Suggested reference: Aero Detail 18; Aerodata International No.12; 'He 111', AJ Press, Poland; 'Heinkel He 111: A Documentary History', Nowarra (Janes).


![]()